

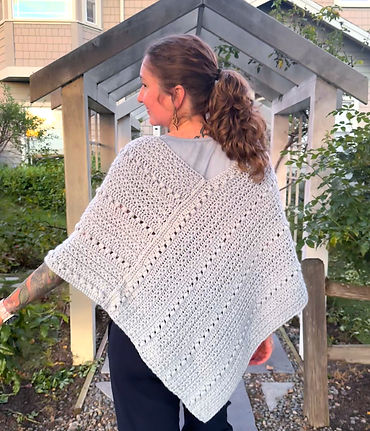
The Starlight Poncho
The Starlight Poncho transforms the soft, textured stitch pattern from the Starlight Throw into a cozy, wearable layer that is easy to crochet with a relaxing rhythm. Simple construction and generous drape make it an approachable project you’ll reach for all season long.
The Starlight Poncho
The Starlight Poncho was inspired by the same soothing stitch combination I fell in love with while designing the Starlight Throw, and it quickly became one of those projects I couldn’t wait to pick up each day. Simple repeats, soft texture, and an easy two-panel construction make it a relaxing and approachable make for any level.
If you’d like to read more about how this design came together, including the desert trip and the moment the idea clicked, you can find the full behind-the-scenes story on the Day With Rae blog!
Copyright notice
This pattern and all accompanying photos are the property of Day With Rae © 2025. They are intended for personal use only and may not be copied, distributed, or sold in any form.
You may sell finished items made from this pattern in small quantities, provided credit is given to Day With Rae as the designer. For example: “Pattern by Day With Rae - www.daywithrae.com”.
Unauthorized use, reproduction, or distribution of this pattern or its photos is prohibited. For questions about licensing or permissions, please contact rae@daywithrae.com
About the Pattern
The pattern is written in US crochet terms and measurements are in inches. The pattern is two identical rectangles worked in rows that are then joined with two quick seams to make the final shape. Please read the whole pattern first to get a feel for the construction and steps of the piece before starting.
Sizing will be listed as follows XS/S (M/L, XL/2XL, 3XL/4XL).
Materials
For the featured Starlight Poncho, I used Loops & Threads Impeccable yarn in the shade "Smoke". This acrylic worsted weight is easy to work with, affordable, machine washable, and allows the stitch definition in this pattern pop. If you’d like to customize, you can substitute with any medium (4) worsted weight yarn.
Yarn: Loops & Threads Impeccable in the shade Smoke, or any Medium / Worsted Weight, #4 yarn.
*Estimated skeins based on Loops & Threads Impaccable.
Hook: US J/10 (6.0 mm) and US 7 (4.5mm) crochet hook
(adjust as needed to meet gauge)
Notions:
-
Yarn needle (for seams and weaving in ends)
-
Stitch markers, scissors, and measuring tape as necessary

Sizing
This poncho uses the Craft Yarn Council’s standard body measurements for chest and cross back (shoulder to shoulder). Because the poncho has generous positive ease and isn’t fitted at the bust, use these measurements as a guide to choose the size that will give you the drape and coverage you prefer.

Stitches
Below are the stitches and techniques used in the Starlight Poncho.
All stitches are written in U.S. crochet terminology.
Abbreviations
-
YO – yarn over
-
sk – skip stitch
-
ch – chain
-
sc – single crochet
-
hdc – half double crochet
-
dc – double crochet
-
hdc2tog – half double crochet two together
Foundation Single Crochet (fsc)
This technique creates your foundation chain and first row of stitches at the same time. It gives your blanket a stretchy, even edge and removes the tightness that often comes from working into a traditional chain.
Ch 2. Insert hook into the first ch, YO, pull up a loop (2 loops on hook).
YO, pull through 1 loop (this forms the “chain”).
YO, pull through both loops (this completes the sc).
Insert hook into the “chain” you just made, YO, pull up a loop.
Repeat steps 2–4 until you have the desired number of stitches.
Star Stitch
A textured two-row stitch that creates a soft, twinkling look. The stitch that gives this blanket it’s name!
Row 1 (Star Row)
Ch 3.
Insert hook into the first ch from hook, YO, pull up a loop.
Insert hook into the second ch, YO, pull up a loop.
Insert hook into the first st, YO, pull up a loop.
Insert hook into the second st, YO, pull up a loop.
Insert hook into the third st, YO, pull up a loop.
YO, pull through all 6 loops. Ch 1 — this creates the “eye.”
For the rest of the row:
Insert hook into the eye of the previous star, YO, pull up a loop.
Insert hook between the legs of that star, YO, pull up a loop.
Insert hook into the last st used, YO, pull up a loop.
Insert hook into the next st, YO, pull up a loop.
Insert hook into the next st, YO, pull up a loop.
6 loops on hook.
YO, pull through all loops. Ch 1.
The second row is made up of hdc, worked into the “eye” of the star stitch in the previous row.
Puff Stitch
Always worked on the wrong side of the blanket to create puffy texture that appears on the right side of the blanket.
Insert hook into st, YO, pull up a long loop.
*YO, insert hook into the same st, YO, pull up a long loop.*
Repeat between * * 3 more times.
YO, pull through all loops.
Ch 1 to close.
If you’re a visual learner like me, I love these tutorials from Nordic Hook:
-
Star Stitch: https://nordichook.com/star-stitch/
-
Puff Stitch (start at step 8): https://nordichook.com/aligned-puff-stitch/

Gauge
Gauge photos are from a swatch in color “Cloud”.
Star Stitch Section:
7 star stitches × 5 rows = 4” × 4” using US J/10 (6.0 mm) hook.
Double Crochet + Puff Stitch Section:
Approximately 5 puff stitches per 4”.
All of Section 1 & 2 together measures about 5” in height when worked with:
-
US 7 (4.5 mm) for double crochet rows
-
US J/10 (6.0 mm) for puff stitch rows and star stitch rows
Adjust hook size as needed to meet gauge. If your swatch begins to ripple or wave when transitioning between the star stitch and the dc/puff section, try going down one hook size for the double crochet rows. For me, switching down to a US 7 hook created a smooth, even fabric.


Pattern
Depending on your size, you’ll create two rectangles the following dimensions as listed below:
XS/S: 17” × 33”
M/L: 18” × 35”
XL/2XL: 19” × 37”
3XL/4XL: 20” × 39”
Foundation
Hook: US J/10 (6.0 mm)
Start with a Foundation Single Crochet (fsc) of 114 (120, 132, 138) stitches.
If you prefer a traditional chain, ch the following number for your size :
115 (121, 133, 139). Sc in the second ch from hook and in each st across.
Section 1: Star Stitches
Hook: US J/10 (6.0 mm)
Row 1:
Ch 3.
Insert hook into the first ch from hook, YO, pull up a loop.
Insert hook into the second ch, YO, pull up a loop.
Insert hook into the first st, YO, pull up a loop.
Insert hook into the second st, YO, pull up a loop.
Insert hook into the third st, YO, pull up a loop.
(6 loops on hook.)
YO, pull through all 6 loops. Ch 1 — first star complete.
To continue across the row:
*Insert hook into the eye of the star you just made (ch 1 space), YO, pull up a loop.
Insert hook between the legs of the previous star, YO, pull up a loop.
Insert hook into the last st used for the previous star, YO, pull up a loop.
Insert hook into the next st, YO, pull up a loop.
Insert hook into the next st, YO, pull up a loop.
(6 loops on hook.)
YO, pull through all 6 loops. Ch 1.*
Repeat from * to * across, stopping when 1 stitch remains unworked.
In the last used st of the previous star and the final unworked st, work hdc2tog.
Row 2:
Ch 1, turn. Hdc in the first st.
Work 2 hdc in each star eye (each ch 1 space) across.
Hdc in the final st.
Repeat Rows 1–2 two more times (for a total of 3 star stitch rows).
Section 2: Double Crochet + Puff Stitches
You will alternate between your smaller hook (to adapt to the different gauge and avoid waves in the blanket) and your larger hook (for nice fluffy puff stitch texture).
Row 1, using hook: US 7 (4.5 mm): Ch 1, turn. Dc in first st and in each st across.
Row 2 – Puff Stitch Row. Switch to Hook US J/10 (6.0 mm):
Ch 1, turn. Hdc in first st. Ch 2, sk 2. *Work a puff stitch in next st:
Insert hook into st, YO, pull up a long loop.
(YO, insert hook into same st, YO, pull up a long loop) 4 total times.
YO, pull through all loops. Ch 2, sk 2.*
Repeat from * across.
Hdc in final st.
Row 3: Switch back to Hook US 7 (4.5 mm). Ch 3 (counts as dc), turn. Dc in next st and in each st across.
Row 4: Ch 1 (does not count as st), turn. Sc in first st and in each st across.
Repeat Sections 1 and 2 until your piece is 17 (18, 19, 20) inches wide.
The first piece is complete! Trim out, and repeat all steps for a second identical piece.
Seaming your panels together:
-
Tips for joining the panels - See diagrams below for reference:
-
Measure the short end of Panel A, then use stitch markers to mark off that same length on the long edge of Panel B. This helps ensure your poncho doesn’t twist and that your seams line up neatly. Repeat the same process when joining the second seam.
-
You are welcome to use whichever seaming method you prefer. I chose the Flat Slip Stitch seam.
First seam: Attach the short end of Panel A to the bottom edge of the long side of Panel B (see first diagram below)
Then fold the joined panels into the poncho shape as shown in second diagram below to line up for the second seam.
Second seam: Seam the short end of Panel B to the long edge of Panel A to close the poncho.
Add tassel if you like, and seam in your ends!


