
How to Make Yarn Tassels for Crochet Blankets & Other Projects

Updated: 8 hours ago

There are lots of ways to make yarn tassels, and over time, I’ve found this is my favorite method! While there are simpler options to create a tassel, this version creates beautiful, very clean-looking, long tassels, and works wonderfully for adding a finishing touch to crochet blankets and other projects. In this tutorial, I’ll walk you through how I make the tassels featured on my Starlight Throw, sharing each step so you can recreate the look for your own projects. Feel free to experiment with different lengths and fullness to find the style you love!
If you prefer a video tutorial, you can follow along on my YouTube Tutorial here!
Materials

You will need:
Yarn of your choice
Scissors
A book or piece of cardboard. The book I used for this tutorial is 8.5 x 5.5 x 1.5 inches. which makes a final tassel that is about 6 inches long. The bigger the book, the longer the tassels will be!
Optional: Crochet hook
Instructions
Step 1: Start with your yarn tail at the page-end of the book, preparing to wrap around the width of the book

Step 2: Wrap the yarn around the width of the book about 10 times. Note: the more you wrap the yarn around the book, the fuller the tassel will be

Step 3: Ending with your yarn at the page-end of the book (the same side you started from), cut the tail from your skein, turn the book page-end up, slide your scissors into the small gap made by the cover of the book, and cut through all the strands.

You'll should have 10 strands of yarn of even length like so:

Step 4: Set your group of 10 strands aside for a moment. Now we will make one longer strand by wrapping once around the long edge of the book.

Step 5: Pick up the project that you are attaching tassels to. In this case, I have a gauge swatch sample from the Starlight Throw pattern. I'll be attaching the tassel in a chain space I made for the border. I'll be using a crochet hook to pull the tassel yarns through the chain space, but you could forego the hook and just use your fingers as well.

Step 6: Picking up the 10 strands you made, pull them through your chain space so that the tails all line up neatly.

Step 7: Now grab your single strand you made using the long edge of the book. This will be used to create a "gathered knot". First, fold one end so you make a loop with the short tail about 3 inches long

Step 8: Place this loop on top of your tassel yarns so that both tails are visible above the crochet piece, and the loop end will sit at the halfway point of your tassel ends as shown:

Step 9: leaving the loop and the short tail in place, grab the long tail and begin wrapping it tightly around all of your gathered strands. You'll wrap them neatly, one wrap stacked below the previous, so until you have about an inch of the wrapped strand around the bundle. The short tail should remain visibile at the top, and the loop you made should remain visible at the bottom of the wraps.


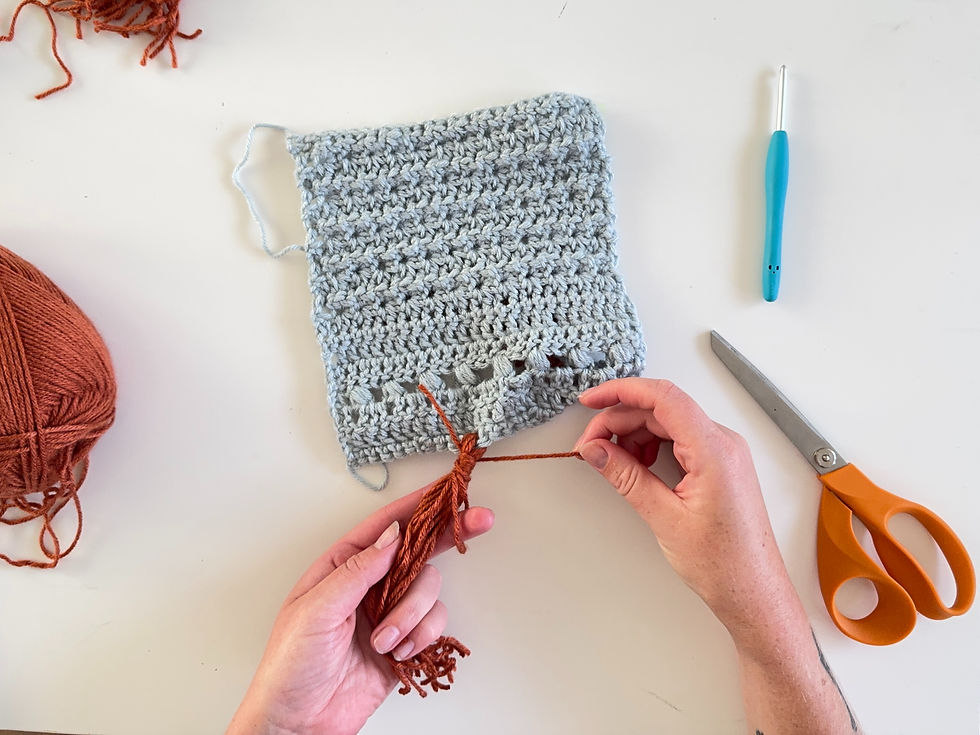
Step 10: Once you've tightly wrapped the long tail around the bundles, you'll insert that tail through the loop you left visible at the bottom (the loop my left-hand finger is through in the photo above)
Now you will hold the tail you inserted through the loop at the bottom with one hand, and pull the tail you have at the top with the other. Continue pulling until the bottom loop is tugged snugly beneath the wrapped yarns.

Step 11: Trim the tails left behind from the last step. And you're done!
And that’s how I make my favorite yarn tassels! Tassels can be used in tons of crafts, whether you’re adding fringe to a crochet blanket, finishing a handmade scarf, or giving a macramé project a polished touch, these simple DIY yarn tassels are an easy way to bring your project together. The wrapped gathering knot creates a neat, secure finish, while adjusting the length and thickness of your tassels lets you customize the look to suit your style. Try them on your next handmade project, and if you're loking to put this in practice on a crochet project, check out my free Starlight Throw pattern, or support my work by purchasing the downloadable PDF here!


Comments