

Cotton Candy Cardigan
This pastel-perfect creation is as cozy as it is captivating. Soft yarn in soft colors makes for a dreamy wearable, and the single-panel design paired with half double crochet stitches makes it just as fun to create as it is to wear.
Cotton Candy Cardigan
Whether you’re after a crochet pattern that’s both stylish and simple or looking to expand your collection of cool, cozy pieces, this cardigan is a perfect fit. With its easy stitches and charming silhouette, the Cotton Candy Cardigan is ideal for beginners seeking a project that balances fun and fashion. Just follow my step-by-step guide to bring this fluffy favorite to life!
I am honestly obsessed with this cardigan. I wear it constantly, and it was such a joy to design. I’m a big fan of tweed and speckled yarns, so when I saw these lovely colors from Big Twist, I couldn’t resist. The colorful flecks add a playful texture that really elevates the whole look. Since the colors reminded me of cotton candy, I leaned into that fluffy theme with chunky ribbing and a cozy collar.
Of course, while the sweater’s name was inspired by my yarn choices, you can absolutely make it your own with your favorite color pairings to create your perfect cozy combo!
Copyright notice
This pattern and all accompanying photos are the property of Day With Rae © 2025. They are intended for personal use only and may not be copied, distributed, or sold in any form.
You may sell finished items made from this pattern in small quantities, provided credit is given to Day With Rae as the designer. For example: “Pattern by Day With Rae - www.daywithrae.com”.
Unauthorized use, reproduction, or distribution of this pattern or its photos is prohibited. For questions about licensing or permissions, please contact rae@daywithrae.com
About the Pattern
The construction is one of my favorites: with just two seams (under the sleeves and along the sides), it works up much quicker than traditional multi-panel sweaters. I hope you find it as fulfilling to make—and wear—as I did. It’s a handmade wardrobe addition you’ll be proud of!
This pattern is written using US crochet terms, and sizing is listed in inches.
This pattern includes directions for sizes XS-2XL. Stitches and rows will be listed like this: XS (S, M, L, XL, 2XL)
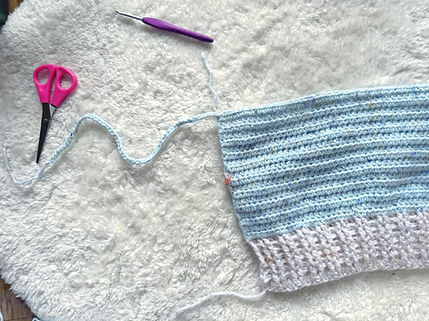
This pattern is fun because it's all worked in one piece, only requiring seams to join beneath the arms and down the sides. The pattern starts with the ribbing on the back panel, then expands to build the sleeves, and lastly you’ll work the front panel on one side, then the second side. You’ll finish with the cuff ribbing and then the inner line on the front panels and around the neck. See the photos below for a visual!
Here is before any seaming is done.

To seam, you will fold it in half like so:

Materials
-
Any worsted weight yarn. I used Big Twists “Fleck“ line which is 85% acrylic, 10% polyamide, and 5% linen. The main color in this pattern is Blue Raspberry, and the accent and ribbing color is Ice Cream Cake.
-
US G / 4.0mm hook, or whatever size necessary for you to hit gauge
-
US I / 5.5mm hook for the last rows on the front panels.
-
Yarn needle, scissors, measuring tape, stitch markers
Yarn Yardage Requirements

Stitches
Stitches used in this pattern include:
-
Ch(s) = chain(s)
-
Sk = skip
-
Sl St = slip Stitch
-
Hdc = Half Double Crochet
-
Dc = Double Crochet
-
BPDC = Back Post Double Crochet
-
FPDC = Front Post Double Crochet
Gauge
Ribbing - alternating 2 FPDC, 2 BPDC.
18 stitches x 10 rows of ribbing st = 4"x4"
Half double crochet
15 stitches x 11 rows = 4" x 4"
Adjust hook size as needed to match gauge for proper fit.
Size Chart

Pattern
Body - back panel
Ribbing
To get the thick, full texture ribbing of this cardigan, we’ll be doing an alternating 2 FPDC and 2 BPDC stitch pattern.
Begin with your accent color (I’m using “Ice Cream Cake” as my accent color) and ch the following number for your size: - 48 (64, 76, 92, 108, 124)
Row 1: In 4th ch from hook, work 1 dc. The ch 3 counts as the first st. Dc in each ch across to end. - 48 (64, 76, 92, 108, 124)
Row 2: Ch 3 and turn. Ch 3 counts as first st here and for all ribbing. Work a dc around the front of the stitch post from the previous row (making a FPDC). FPDC in next st. Work a BPDC in each of the next 2 st. FPDC in next 2 st, BPDC in the next 2 st. Repeat until the end of the row, placing a dc in the last st. - 48 (64, 76, 92, 108, 124)
Row 3: Ch 3 and turn. Work BPDC in next 2 st. Work FPDC in next 2 st. Repeat until end of row, placing a dc in the last st. - 48 (64, 76, 92, 108, 124)
Row 4 - 7: Repeat rows 2 and 3. - 48 (64, 76, 92, 108, 124)
Switch to main color.
I’m using “Blue Raspberry” as my main color
Row 8: Ch 1. Throughout the body of the pattern, the first ch does not count as a st. Work a hdc in the first st and across to the end of the row. - 48 (64, 76, 92, 108, 124)
Row 9- 25 (26, 26, 28, 30, 32): Repeat row 7. - 48 (64, 76, 92, 108, 124)

Sleeves:
Here we will begin the sleeves. Do not trim out, but leave your working end and skein of yarn for this next step.
On the opposite end of your working yarn, attach a fresh skein of yarn. I used a slip knot, and joined it in the last st with a sl st, tightening it up so it doesn’t get confused for a st.
Now chain the following number of stitches for your size: 54 (56, 56, 58, 58, 60). Trim out.
Return to your original working end and chain the following number of st for your size: -
55 (57, 57, 59, 59, 61). The additional chain on this side accounts for the turning chain.
From here you’ll now work across the chain row which is the base of the right sleeve, then across back of the cardigan, then the chain making the base of the left sleeve.

Sleeves
Row 1: Work a hdc in second chain from hook and across, continuing across the body of hdc, and across the ch row you made on the opposite side. - 154 (174, 188, 206, 222, 242)
Row 2: Ch 1, turn. Ch doesn’t count as st. Hdc in first st and across to end. -154 (174, 188, 206, 222, 242)
Row 3 - 14 (15, 16, 17, 18, 19): Repeat Row 2. -154 (174, 188, 206, 222, 242)
Switch to your accent color, repeat Row 2 the following number of rows for your size: 3, (3, 5, 5, 7, 7).
Neckline
We will now mark the opening for the neck, and continue working on just one side of the cardigan, finishing the sleeve and working down the front panel of the cardigan.
To mark the neck opening, place a stitch marker 64 (74, 82, 92, 100, 110) from either end. There should be 24 stitches (about 7") between stitch markers for the neck opening.

Row 1: From the working end, ch 1 and turn. Hdc in the first st and across to the st marker. - 64 (74, 82, 92, 100, 110)
Row 2: Ch 1 and turn. Hdc in the first st and across to the end. - 64 (74, 82, 92, 100, 110)
Rows 3 (3, 5, 5, 7, 7): Repeat Row 2. - 64 (74, 82, 92, 100, 110)
Switch yarn to your main color.
Repeat row 2 above but in your main color the following number of rows depending on your size: 3 (4, 5, 6, 7, 8). - 64 (74, 82, 92, 100, 110)
Front panel increasing
Row 1: Ch 1 and turn. Hdc in the first st and across. In the final st, work 2 hdc to increase.
- 65 (75, 83, 93, 101, 111)
Row 2: Ch 1 and turn. Hdc in first st and across. - 65 (75, 83, 93, 101, 111)
Repeat Rows 6 and 7 [4] more times.
Row 11: Ch 1 and turn. Hdc in the first st and across. In the final st, work 2 hdc to increase. - 70 (80, 88, 98, 106, 116)
This is the end of the sleeve. We’ll continue the front panel until it equals the length of the back panel.
Row 12: Ch 1 and turn. Hdc in the following st: 16 (24, 32, 40, 48, 56)
Row 13: Ch 1 and turn. Hdc in first st and across: - 16 (24, 32, 40, 48, 56)
Rows 14 - 29 (30, 30, 32, 34, 36): Repeat Row 18.
Front panel ribbing
Switch your yarn to your accent color.
Row 1: Ch 3 and turn. Ch 3 counts as the first st for the ribbing portions of the pattern. Dc in the next st and across. - 16 (24, 32, 40, 48, 56)
Row 2: Ch 3 and turn. Work a FPDC in the next 2 st. Then work a BPDC in the next 2 st. Repeat to the end, finishing with a dc in the turning ch from the previous row. -16 (24, 32, 40, 48, 56)
Row 3: Ch 3 and turn. Work a BPDC in the next 2 st. Then work a FPDC in the next 2 st. Repeat to the end, finishing with a dc in the turning ch from the previous row. - 16 (24, 32, 40, 48, 56)
Rows 4-7 Repeat Rows 2 & 3 [2] more times. Trim out.


Second Front Panel
At the end of the unfinished sleeve, join your accent color.
Row 1: From the working end, ch 1 and turn. Hdc in the first st and across to the st marker. - 64 (74, 82, 92, 100, 110)
Row 2: Ch 1 and turn. Hdc in the first st and across to the end. - 64 (74, 82, 92, 100, 110)
Rows 3 (3, 7, 7, 11, 11): Repeat Row 2. - 64 (74, 82, 92, 100, 110)
Switch yarn to your main color.
Row 1: Ch 1 and turn. Hdc in the first st and across to the end. - 64 (74, 82, 92, 100, 110)
Repeat Row 1 the following number of rows: 2 (3, 4, 5, 6, 7). - 64 (74, 82, 92, 100, 110)
Front Panel Increasing
Row 1: Ch 1 and turn. Hdc in the first st and across. In the final st, work 2 hdc to increase.
- 65 (75, 83, 93, 101, 111)
Row 2: Ch 1 and turn. Hdc in first st and across. - 65 (75, 83, 93, 101, 111)
Repeat Rows 6 and 7 [4] more times.
Row 11: Ch 1 and turn. Hdc in the first st and across. In the final st, work 2 hdc to increase. - 70 (80, 88, 98, 106, 116)
This is the end of the sleeve. We’ll continue the front panel until it equals the length of the back panel.
Row 12: Ch 1 and turn. Hdc in the following st: 16 (24, 32, 40, 48, 56)
Row 13: Ch 1 and turn. Hdc in first st and across: - 16 (24, 32, 40, 48, 56)
Rows 14 - 29 (30, 30, 32, 34, 36): Repeat Row 18.
Front Panel Ribbing
Switch your yarn to your accent color.
Row 1: Ch 3 and turn. Ch 3 counts as the first st for the ribbing portions of the pattern. Dc in the next st and across. - 16 (24, 32, 40, 48, 56)
Row 2: Ch 3 and turn. Work a FPDC in the next 2 st. Then work a BPDC in the next 2 st. Repeat to the end, finishing with a dc in the turning ch from the previous row. -16 (24, 32, 40, 48, 56)
Row 3: Ch 3 and turn. Work a BPDC in the next 2 st. Then work a FPDC in the next 2 st. Repeat to the end, finishing with a dc in the turning ch from the previous row. - 16 (24, 32, 40, 48, 56)
Rows 4-7 Repeat Rows 2 & 3 [2] more times. Trim out.
Next, complete the second front panel. At the end of the unfinished sleeve, join your accent color.
Row 1: From the working end, ch 1 and turn. Hdc in the first st and across to the st marker. - 64 (74, 82, 92, 100, 110)
Row 2: Ch 1 and turn. Hdc in the first st and across to the end. - 64 (74, 82, 92, 100, 110)
Rows 3 (3, 7, 7, 11, 11): Repeat Row 2. - 64 (74, 82, 92, 100, 110)
Switch yarn to your main color.

Sleeve Cuffs
Join the accent color at the end of the right sleeve to start the cuff.
Row 1: Work one sc in the side of each row to set the foundation for ribbing. 34 (36, 42, 44, 46, 52)
Row 2: Ch 3 and turn. Ch 3 counts as the first st for the ribbing portions of the pattern. Dc in the next st and across. - 34 (36, 42, 44, 46, 52)
Row 3: Ch 3 and turn. Work a BPDC in the next 2 st. Then work a FPDC in the next 2 st. Repeat to the end, finishing with a dc in the turning ch from the previous row. - 34 (36, 42, 44, 46, 52)
For size extra small, medium, and extra large, repeat row 3 for a total of 7 rows.
For size small, large, 2x large, follow these steps:
Row 4: Ch 3 and turn. Work a FPDC in the next 2 st. Then work a BPDC in the next 2 st. Repeat to the end, finishing with a dc in the turning ch from the previous row. - 17 (24, 32, 39, 47, 54)
Rows 4-7 Repeat Rows 2 & 3 [2] more times.
Finishing Touches
Fold the cardigan in half. You’ll seam along the length of the sleeve, and down the side of the cardigan on each side.
Collar
Join in the accent color at the bottom corner with a size US I/5.5mm hook. Each stitch will be placed in the end of the rows that make up the cardigan’s front panels.
Row 1: Ch 3 (counts as st here and throughout). Work 1 dc into the next st and across to end, placing a double crochet in the final st.
Row 2: Ch 3 and turn. Work a FPDC in each st across to end.
Repeat row 2 [3] more times.
Trim out, weave in all your loose ends, and you’re done!